The CATS compute nodes were decommissioned on 6/24/2013. Login nodes and storage were decommissioned on 8/24/2016.
CATS is the Combustion And Turbulence Simulator - an HPC cluster of 36
Dell servers, each featuring dual, dual-core 3GHz Intel Xeon 5160 "Woodcrest" processors with 8 GB RAM,
tied together using a QLogic 4X SDR InfiniBand interconnect.
CATS also includes a pair of interactive login nodes called catslogin and catslogin2, each holding
3 terabytes of file storage, with the same Woodcrest processors and 16 GB RAM. These two machines are
connected to the head node (cats001) and the 35 compute nodes (cats002-cats036) via a switched gigabit
Ethernet fabric. Each compute node has 45 GB of local scratch space. The system
configuration page for CATS provides further details on this resource.
For its operating system, CATS currently runs Microsoft Windows Server 2008 R2 (SP1) HPC Edition on the
compute nodes, and Windows Server 2008 R2 (SP1) Enterprise on catslogin and catslogin2.
The head node, cats001, runs the job scheduler, which is responsible
for initiating and controlling the parallel batch jobs that may be spread across the 140 cores of
the other 35 compute nodes. The cluster and its Windows-based software environment were featured in a
2009
Microsoft Case Study.
CATS is reserved for the exclusive use of the
Turbulence and Combustion Group in the
Sibley School of Mechanical and Aerospace Engineering
at Cornell University. It is operated and maintained for that group by the Cornell
Center for Advanced Computing. The Principal Investigator for
CATS is Prof. Stephen B. Pope; the co-PI is
Dr. Steven R. Lantz. Funding for CATS
was provided through an AFOSR DURIP grant, agreement number FA9550-07-1-0288.
Logging In
Connect to catslogin or catslogin2 using Remote Desktop Connection, which is preinstalled as an
accessory in all current versions of Windows. Version 2.1.1 of a nice
client for Mac
can be downloaded; it is not supported for OS X 10.7 "Lion" or higher, but you may find
that it works anyway. For Linux, the appropriate client is called rdesktop. It can be accessed
using the tsclient graphical front end. (If you use tsclient, make sure you specify the "RDPv5"
protocol.)
You should log in using your CAC userid. Please make sure the domain is CTC_ITH.
Equivalently, you can enter your userid as CTC_ITH\myid or myid@tc.cornell.edu.
There is a bug in rdesktop that may cause the mouse pointer/cursor to have an incorrect appearance
when the remote host runs Windows Server 2008 R2. If you experience this problem, please
check here for possible solutions.
In an RDP session, users are no longer allowed to reset the DPI to make characters larger. The
relevant selections in the Display control panel are grayed out in Windows Server 2008 R2.
If you find the default character size to be unacceptably small, your only recourse is to reset the
values of certain registry keys. From
this site
you can download .reg files that will accomplish this for you.
Storing and Accessing Files
User storage on catslogin and catslogin2 is on the local T: drive.
You can think of "T" as standing for "Terabyte", because it corresponds to each node's local
1 TB RAID-5 disk array. Files should be stored in one of two folders on
the T: drive. Long-term files belong in T:\Users\myid, while temporary files go in T:\Work\myid.
(Please do not store files on the CAC's general-purpose file server, \\storage01.cac.cornell.edu,
even though you may have a folder called "myid" defined there--mapped to letter drive H:--as well.)
A more recent addition to each machine is X:, which is a single 2 TB non-RAID disk providing bulk
storage for less critical data. Access speed is relatively slow and the reliability is not as good
as RAID, so actively running jobs should not do I/O to this disk. You can create a personal folder
X:\Xtra\myid on either machine, if you desire such storage.
To access your files remotely in Windows (e.g., from your laptop), you can navigate to a network
share in the usual way. For example, you can enter \\catslogin.tc.cornell.edu\Users\myid in an address
bar; or you can map a network drive under Tools in any folder window, or via "net use" at the command
prompt. The following network shares are defined:
| |
\\catslogin.tc.cornell.edu\Users
\\catslogin.tc.cornell.edu\Work
\\catslogin.tc.cornell.edu\Xtra |
|
\\catslogin2.tc.cornell.edu\Users
\\catslogin2.tc.cornell.edu\Work
\\catslogin2.tc.cornell.edu\Xtra |
|
(RAID-5)
(RAID-5)
(non-RAID) |
Previously, you would always keep your most important files in T:\Users\myid on one or both login
nodes, because that folder was backed up regularly by CIT's EZ-Backup service. However, that service
was discontinued for CATS users on 3/18/13. Given that the CIT service was costly for large files, it
was previously recommended to store less important data files (e.g., ones that can be recreated) in
T:\Users\myid\scratch, which is not backed up, or in T:\Work\myid, on one or both login nodes.
Today the best way to create a backup is to mirror your files between the two login nodes. A couple
of utilities can be helpful for comparing or synchronizing files between the two machine. The first
is WinDiff, located in C:\Program Files\Microsoft SDKs\Windows\v7.0\Bin\x64. The other is
robocopy, available at the command prompt. Here is a sample robocopy command that can be used to
sync files if you are on (e.g.) catslogin2:
- robocopy "\\catslogin\Users\user_name" T:\Users\user_name /R:1 /W:5
- /E /COPY:DAT /DCOPY:T /TS /FP /TEE /LOG+:user_name_copy_catslogin.txt
Network shares can easily be accessed from other platforms. From Macs, make them
available in the Finder by choosing "Go > Connect to Server...", then entering
(e.g.) "smb://myid@catslogin.tc.cornell.edu/Users". From Unix or Linux, use smbclient.
To make file sharing work from off campus, you will need to have a VPN client running and connected
to Cornell's VPN server. You can download the Cisco VPN client (for Windows or Mac) by going to
cit.cornell.edu and searching for "vpn client". (CIT does not support VPN for Linux but suggests
VPNC.) The reason for the Virtual Private
Network is security. To deter hacking, most CAC-supported machines only allow such connections from
inside the (real or virtual) cornell.edu domain.
Finally, every compute node contains a local (non-networked) 45 GB partition that can be used for
scratch space during computations. The drive letter is D:. If you want to use any local D: space,
please create a top-level folder named with your userid as part of your batch script.
Compiling and Linking Codes
Catslogin provides the Microsoft Visual Studio 2008 integrated development environment (IDE)
into which the following compilers are integrated:
Microsoft Visual C/C++ 2008, Intel C/C++ 11.1, and Intel Visual Fortran 11.1, among others.
If desired, any one of these compilers can be invoked from the command line in a Windows
command shell (cmd) as well. However, the Visual Studio
environment is preferred because it doubles as a debugger.
Using the Microsoft Visual Studio 2008 IDE
In Visual Studio, you begin by creating a solution that builds one or more
projects.
Roughly speaking, the projects within a solution are equivalent to the targets of a Linux
makefile. Each separate project corresponds to one executable or one library that is to be built.
To start a new project that (e.g.) builds an executable, given one or more files of Fortran
code, first select "File | New | Project...", then "Intel Fortran | Console Application", then
"Empty Project".
Next, add files containing source code to the project using "Project | Add New [or Existing]
Item...".
Compilation is controlled through the Properties dialog, in the Project menu. This dialog is
nothing more than a GUI for setting the command-line compiler flags. You can define multiple
configurations for each project. The active configuration determines the
actual set of flags that is passed to the compiler when the project is built.
By default, there are two configurations named Debug and Release that are predefined for the
Win32 platform, and Debug is the active configuration.
The problem is we don't generally want to use the Win32 platform; we want the x64 platform.
Strangely, this choice does not appear anywhere in the Properties dialog until you click the
Configuration Manager button (which is also available from "Build | Configuration Manager").
Under "Active solution platform", choose "New...", then "x64", then "OK" the
changes you have made.
(Note: Unexpected problems with the Visual Studio interface can sometimes be cleared by
starting it up with "devenv /resetsettings".)
Linking the MS-MPI Library
For MPI codes, a few more steps are necessary in Properties. Set the Configuration
to All Configurations and add the following items. Note, the locations have changed slightly
for HPC Pack 2008 R2, as compared to previous releases:
- For x64 platform -
- C/C++/Fortran | General | Additional Include Directories:
- C:\Program Files\Microsoft HPC Pack 2008 R2\Inc
- Linker | General | Additional Library Directories:
- C:\Program Files\Microsoft HPC Pack 2008 R2\Lib\amd64
- Linker | Input | Additional Dependencies:
- msmpi.lib msmpifec.lib
For Fortran codes, in addition to msmpi.lib, one of the msmpif*c.lib static libraries is
required, as indicated above:
- msmpifec.lib supports Fortran compilers that put the string length of character variables
at the very end of the parameter stack (e = end; most common case).
- msmpifmc.lib supports Fortran compilers that put the string length of character variables
immediately after the corresponding string pointers on the parameter stack (m = mixed).
For Fortran 90/95 projects, it's likely you will want to add the source file for the MPI
module, which is:
- C:\Program Files\Microsoft HPC Pack 2008 R2\Inc\mpi.f90.
The Intel EM64T processors on CATS can run either 64- or 32-bit applications, so it is possible
to compile and link MPI codes for the Win32 platform, as well as x64, if desired. To build for
Win32, only one minor change must be made to the above Properties:
- For Win32 platform -
- Linker | General | Additional Library Directories:
- C:\Program Files\Microsoft HPC Pack 2008 R2\Lib\i386
Linking Intel's Math Kernel Library (and other libs)
Similar steps to the above are involved for linking libraries other than MPI. For example, should
one wish to link any of the LAPACK or BLAS routines in Intel's MKL 11 (with a choice of static linking,
rather than dll's), here are the additions to make in the Visual Studio dialogs and tabs:
- For x64 platform, multithreaded -
- C/C++ | General | Additional Include Directories (optional for Fortran):
- C:\Program Files (x86)\Intel\Compiler\11.1\051\mkl\include
- Linker | General | Additional Library Directories:
- C:\Program Files (x86)\Intel\Compiler\11.1\051\mkl\em64t\lib
- Linker | Input | Additional Dependencies:
- mkl_intel_lp64.lib mkl_intel_thread.lib mkl_core.lib libiomp5mt.lib
- For x64 platform, sequential - [use the above settings, except:]
- Linker | Input | Additional Dependencies:
- mkl_intel_lp64.lib mkl_sequential.lib mkl_core.lib
Linking to MKL has become rather complicated due to Intel's decision to maximize MKL's flexibility
and multi-platform compatibility by splitting off multithreading into four separate layers of
libraries. The four libraries listed above correspond to the four essential layers: interface layer,
threading layer, computational layer, and runtime (OpenMP) layer. For more help, including examples
of using both static and dynamic linking in various ways, refer to the Intel MKL User Guide,
C:\Program Files (x86)\Intel\Compiler\11.1\051\Documentation\en_US\mkl\userguide.pdf, Chapter 5. Even
better is the Intel
Link Line Advisor (note, the MKL version on CATS is 10.2).
Want to know what's in a given library? Open up Intel's "Fortran Build Environment" command window
(in the Start menu), move to the folder with the lib in question, and type:
- dumpbin /linkermember:2 libname.lib
Testing and Debugging Codes
For the most part, all testing and debugging should be done on a login node. (This is contrary
to the normal policy on other CAC clusters, but catslogin and catslogin2 are dedicated for the use
of the Turbulence and Combustion Group, which sets CATS policies in accordance with its own needs.)
Please be mindful that these are shared, interactive machines, so running tests on more than 2
cores is generally not a good idea.
Serial debugging is done entirely within Visual Studio, using the Debug menu.
Parallel debugging can also be done with Visual
Studio, but it's more involved. Sometimes inserting print statements is just as effective.
Here's a useful little article from Intel: "Tips
for Debugging Run-time Failures in Applications Built with the Intel(R) Fortran Compiler".
It presents compiler options that give good diagnostic information with low impact on
performance.
Using the HPC Job Manager
Job submission, monitoring, and control is done through the Job Manager. You can access it from
Start | All Programs | Microsoft HPC Pack | HPC Job Manager. The CATS cluster is
identified through the name of its head node, cats001. When the Job Manager is initially run,
this head node must be identified in order to establish contact with the scheduler running there.
Then you may submit jobs using the Actions | Job Submission menu. Choose "New Job" to get started.
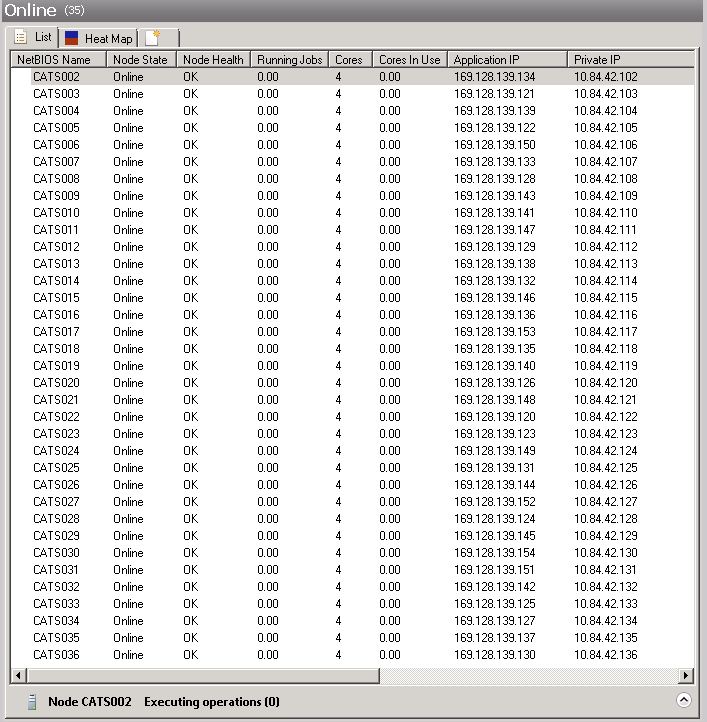
As shown in this figure, the scheduler maintains a master list of all
the compute nodes in the cluster, tabulating each node's current status and the IP addresses at which
to contact it. One address is the Application IP (previously MPI IP): this is associated with the
InfiniBand interface to the cluster's internal high-performance LAN, which is used mainly for MPI
messaging. The other address is the Private IP: this is associated with the Gigabit Ethernet interface
that connects the node to catslogin and catslogin2, as well as to most other Cornell subnets (but not
to the broad Internet).
According to
this reference,
you can get a list of all the nodes in the cluster and their current state by typing:
- node list /scheduler:cats001
Here is a list of guidelines to follow when you use "New Job" to create a new batch job:
- In the "Job Details" pane, be sure to check the box that says "Do not run this job for more
than", and specify a maximum running time. This helps the scheduler do proper backfilling.
- Leave unchecked the box that says "Run job until canceled".
- Don't preserve the default of "auto-calculate" for the min and max of cores; instead, specify a
minimum, and make it equal the maximum. Let's call this number M.
- If you check "Use assigned resources exclusively for this job" (strongly recommended) -
Make M a multiple of four large enough to accommodate the task needing the most cores.
If several tasks will run simultaneously, then add their core counts when setting M.
- If you're willing to share the node (i.e., not exclusive access) -
M can simply be equal to the number of cores simultaneously in use
(i.e., not necessarily a multiple of four).
- Select the "Edit Tasks" pane, and create at least one task with the "Add" button. See below
for details on how to specify MPI tasks. Then:
- Set the task property "Rerunnable" to False.
- Set the task property "Run time" to something specific (less than infinite).
Instead of the above, let's say you check "Run job until canceled", set the task property
"Rerunnable" to True, and leave the "Run time" for the task open. This combination instructs the
scheduler to wait infinitely long for you to re-run (i.e., manually restart) your failed tasks, until
you explicitly cancel the job. It's unlikely this behavior is what you really want. The above
settings are meant to help you avoid tying up CATS resources needlessly.
After entering your job's specifications, you can click "Save Job XML File..." to preserve these
settings for future submissions. This is where the button to "Create New Job from XML File..." comes
in. One word of caution: if you use the button to access a saved job file, but change the number of
cores, the scheduler that may not honor the new number (as experience has shown)! Therefore, the
best practice is to save a different file for every core count you intend to use.
Running Parallel Jobs
To start some number of parallel processes on the nodes assigned to you by the Job Manager, your
batch job (or a script that it invokes) should contain one or more "mpiexec" commands. Two of
mpiexec's most important flags are -n for how many processes to start overall, and -cores for how
many processes to start on each node. Since the CATS compute nodes possess 4 physical cores apiece,
"-cores 4" (the default) is often appropriate. But sometimes a different number is needed. For
example, if some file or set of files is to be copied to each node, then "-cores 1" is
appropriate.
Processes are assigned to nodes by initiating the first 4 (or the -cores limit, if present) on the
first machine, the next 4 on the second machine, and so on. If processes still remain to be assigned
when the end of the machines list is reached, the above sequence is repeated from the beginning of
the list.
The above -n and -cores flags are optional when you enter your mpiexec and other job commands into
the GUI of the HPC Job Manager.
- By default, -n is max_cores, the maximum number of cores you set within the Job Manager
interface.
- If you specify -cores but not -n, this is equivalent to: "mpiexec -n max_procs -cores my_cores",
where max_procs=(max_cores/4)*my_cores.
For further examples, refer to the Job Manager help, or just try some simple tests. Here is a little
.bat script that may help you sort out how processes map to nodes:
- @echo off
- REM rollcall.bat - to find out which ranks are on what nodes
- for /f %%i in ('hostname') do set myhostname=%%i
- echo Rank %PMI_RANK% is on %myhostname%
- @echo on
Note, PMI_RANK is a useful environment variable defined in the environment of any parallel command
launched by mpiexec. It is equal to the numerical rank of the process, an integer from 0 to N-1
inclusive, if N processes were started. It provides a way to assign ranks to processes that are not MPI
tasks but rather parallel instances of some general Windows command.
Running ANSYS FLUENT
FLUENT versions 14.0, 13.0, and 12.1 can initiate jobs on the HPC Job Manager directly from the FLUENT GUI.
The easiest way to do this is via the FLUENT Launcher that appears on application startup. Below are
the settings you would use to start parallel workers on the CATS compute nodes that can be controlled by
your GUI interactively from a login node.
- Dimension: 2D or 3D as needed
- Options: Double Precision (if appropriate) and Use Job Scheduler
- Processing Options: Parallel; set Number of Processes as desired, up to the max for the license, 128
- Show More Options: (click the plus sign to expand)
- General Options -
- Working Directory: \\catslogin\Users... or \\catslogin2\\Users...
- FLUENT Root Path: \\catslogin\fluent14 (for v.14.0) or \\catslogin\fluent2 (for v.13.0)
[on catslogin2] \\catslogin2\fluent14 (for v.14.0) or \\catslogin2\fluent2 (for v.13.0)
- Parallel Settings -
- MPI Types: msmpi (from drop-down)
- Run Types: do NOT check (re-check Use Job Scheduler if you accidentally check here)
- Scheduler -
- Computer Cluster Head Node Name: cats001
- Processor unit: core
When FLUENT starts, you will see exactly which CATS nodes are running the worker processes. In v.13.0,
the console will also falsely report that the system interconnect is ethernet, but ignore this. It's really
using the default InfiniBand (as reported correctly in v.14.0).
You can confirm the interconnect type by running the commands "/parallel latency" and "/parallel
bandwidth" in the console (available via the Parallel > Network menu as well). The results should be
uniformly around 8 microseconds and 900 MB/s, respectively. These results are consistent only with IB
(note, SDR - as of Aug. 2012, the switch is QDR, but the HCAs are still SDR).
Explanation: It seems that FLUENT 13.0 ignores (!) the interconnect setting you give it in the Launcher,
which ultimately ends up as the -pic setting on the command line. Instead, it obeys the setting of the
environment variable CCP_MPI_NETMASK which is pre-set across the cluster. On CATS, this variable is
set to specify the InfiniBand subnet, not the Ethernet.
Running MATLAB in Batch
If your MATLAB script is too computationally intensive to run on the login nodes, you can run it on the
compute nodes instead. First you must compile your m-file to convert it into a standalone executable. The
MATLAB facility for doing such compilations is called mcc. From the MATLAB command line,
simply enter the following:
- mcc -m myscript.m
It's best to copy the script into its own, empty folder first. The mcc command will convert your
script into C code and compile it into myscript.exe, a Windows executable that can be run independently of
the MATLAB interface. As explained in the readme.txt file that is also generated, your exe must have access
to certain runtime libraries. These dll's are preinstalled on the compute nodes, and their location is
already inserted in your default path. Therefore, to run the exe on the compute nodes, all you need to do is
submit a batch job that calls your exe. (Most likely you will want the working directory to be the folder in
which the exe was created.)
Haifeng has written a nice tutorial demonstrating how to run multiple copies of your compiled MATLAB code
simultaneously in parallel on the compute nodes. You can download a zip file
containing a sample batch script, test code, and complete instructions. (Note that in the sample job.xml
file, it is not really necessary to preface each task's Command Line with "mpiexec -l"; this just adds "[0]"
to the beginning of each line of output. It is sufficient just to give the name of the exe.)
Here a few tips to know when creating a MATLAB code that is suitable for mcc:
- If your .m file is a function that takes one or more arguments, put these arguments on the command
line after the path to the runtimes. But remember that the arguments will be input as strings, just like any
arguments (argv) to a C program. Therefore your .m file should use str2num or str2double to convert any input
arguments to the expected type.
- Dump figures into files using "saveas" or "print"; or, write a separate postprocessing script that
reads data files written by multiple tasks and produces the final plots.
- Don't nest curly braces within comment blocks, e.g., %{ comment1 %{ comment2 %} %} - the braces may
be misinterpreted as clause delimiters in C, due to an mcc bug.
- Avoid commands from the Symbolic Math Toolbox, e.g., heaviside(); they may not be recognized.
Finding Software
Here is the list of software currently installed on catslogin and catslogin2.
Items marked with a star (and in parentheses) are installed on (just) the CATS compute nodes.
Items with two stars are installed only on catslogin2.
- ActiveState ActivePerl 5.10.1 (5.12.2*)
- (ActiveState ActivePython 2.7.0.2*, 3.1.2.3*)
- Adobe Flash Player 22.0.0.209
- Adobe Acrobat Reader DC 15.017.20050
- ANSYS 14.0
- CHEMKIN-PRO 15131, 15101, and 15092, x64
- CollabNet Subversion Client 1.6.9
- EnSightCFD3 - in Start | CEI
- EPD, Enthought Python Distribution 6.1-1**
- -- Python 2.6, SciPy, PyLab, IDLE, etc.
- FileZilla 3.3.3
- FLUENT from ANSYS, 14.0
- Ghostscript 8.64
- Google Toolbar for IE, 7.4
- Graphviz 1.16, companion to CHEMKIN-PRO
- GSview 4.9
- Identity Finder 4.1.4.3
- Intel C/C++ Compiler 11.1.051
- Intel Debugger 11.1
- Intel Visual Fortran Compiler 11.1.051
- Intel MKL 10.2 for the Intel 11.1 compilers
- Java JRE/JDK 8 Update 91, 32-bit
- MagicDisc 2.7
- MathType 6
|
|
- Matlab R2012a
- Matlab Compiler Runtime 7.17*/7.14* for R2012a/R2010b
- Microsoft HPC Pack 2008 R2*
- Microsoft HPC Pack 2008 R2 SDK
- Microsoft Office Enterprise 2007
- -- Word, Excel, PowerPoint, Groove
- Microsoft SQL Server 2008
- Microsoft Visual C/C++ Compiler 2008
- Microsoft Visual Studio 2008
- MiKTeX 2.9 (includes pdfTeX)
- Notepad++ 5.9
- ParaView 3.98.1, 64-bit
- PDFCreator 1.2
- PuTTY 0.60
- RealVNC Viewer 4.1.3
- Symantec Endpoint Protection 12.1
- TortoiseHg 2.0.4, 64-bit
- TortoiseSVN 1.6.15, 32- and 64-bit
- VisIt 2.6.2, 64-bit**
- Windows PowerShell 1.0
- WinEdt 6.0
- WinSCP 4.2.8
- Xming 6.9.0.31 + fonts, tools, clients
- installation notes
|
- In the future...?
|
- CutePDF Writer, a PDFCreator alternative
- GNU Emacs
|
Connecting to Linux Systems
PuTTY is provided as a free, secure ssh client for connecting to Linux or Unix systems. To
enable graphical display from these remote systems, PuTTY must be coupled with an X window server.
Xming (also free and open-source) is provided for this purpose. Here is the sequence for starting
an ssh session with X11 forwarding enabled:
- Start Xming by clicking its Quick Launch icon or by selecting it from the Start menu
- Start PuTTY via the "PuTTY -X" shortcut on the desktop or via the Start menu
- Enter the address of your destination (or just double-click a name in your saved list)
- Give a name to your session and click "Save" if you want to re-use this destination
- Verify that SSH | X11 | Enable X11 forwarding is selected
- Click "Open" to log in
After logging out from PuTTY, you can choose to quit Xming by right-clicking its icon in the
System Tray and selecting "Exit".

 Last updated on 7/13/16 by Steve Lantz (slantz ~at~ cac.cornell.edu)
