CAPECRYSTAL
General Information
- capecrystal is a private cluster with restricted access to the following groups: jd732_0001
- Head node: capecrystal.cac.cornell.edu (
access via ssh)- OpenHPC deployment running Centos 7.6
- Cluster scheduler: slurm 18.08.8
- 5 GPU compute nodes c000[1-5]
- data on the capecrystal cluster is NOT backed up
- Please send any questions and report problems to: cac-help@cornell.edu
Hardware
- There is a 893GB local /scratch disk on the head node only.
- capecrystal.cac.cornell.edu: PowerEdge R440; memory: 92GB, swap: 15GB
- capecrystal compute nodes c000[1-5]:
- PowerEdge C4140; memory: 187GB, swap: 5GB
- Each node contains Qty 4 GPUS: 3D controller: NVIDIA Corporation GV100GL [Tesla V100 SXM2 32GB] (rev a1)
Networking
- All nodes have a 10GB ethernet connection for eth0 on a private net served out from the capecrystal head node.
- All nodes include: Infiniband controller: Mellanox Technologies MT27800 Family [ConnectX-5] (ibstat will show you the status on the compute)
How To Login
- To get started, login to the head node capecrystal.cac.cornell.edu via ssh.
- You will be prompted for your CAC account password
- If you are unfamiliar with Linux and ssh, we suggest reading the Linux Tutorial and looking into how to Connect to Linux before proceeding.
Running Jobs / Slurm Scheduler
Queues/Partitions
("Partition" is the term used by slurm for "Queues") * hyperthreading is turned on for ALL nodes - * slurm considers each node to have the following: * CPUs=56 Boards=1 SocketsPerBoard=2 CoresPerSocket=14 ThreadsPerCore=2 RealMemory=191840 * all partitions have a default time of 1 hour
Partitions on the capecrystal cluster:'
| Queue/Partition | Number of nodes | Node Names | Limits | Group Accesss |
|---|---|---|---|---|
| cpushort | 5 | c000[1-5] | walltime limit: 2 hours | jd732_0001 |
| cpu (default) | 5 | c000[1-5] | walltime limit: 12 hours | jd732_0001 |
| cpulong | 5 | c000[1-5] | walltime limit: 168 hours (i.e. 7 days) | jd732_0001 |
| gpushort | 5 | c000[1-5] | walltime limit: 2 hours | jd732_0001 |
| gpu | 5 | c000[1-5] | walltime limit: 12 hours | jd732_0001 |
| gpulong | 5 | c000[1-5] | walltime limit: 168 hours (i.e. 7 days) | jd732_0001 |
ALL partitions have a QOS (Quality of Service) setup to allow one to submit a lower or higher priority on the Capecrystal cluster. The QOS setups are for: low, normal, high and urgent. (default: normal) Therefore if you urgently need your job to bump up higher in the wait queue, submit with:
sbatch --qos=urgent job_name
Slurm Scheduler HELP
CAC's Slurm page is the first place to go to learn about how to use Slurm on CAC clusters. Please take the time to read this page, giving special attention to the parts that pertain to the types of jobs you want to run.
The Slurm Quick Start guide is a great place to start.
Examples & Tips
-
A shared directory has been setup for users to copy singularity containers into in effort to alleviate all users from downloading the same container. You will still need to copy from the shared folder into your $HOME for singularity to run successfully. You can put any container into:
/opt/ohpc/pub/containers -
All lines begining with "#SBATCH" are a directive for the scheduler to read. If you want the line ignored, you must place 2 "##" at the beginning of your line.
Example Singularity HOOMD-blue GPU batch job
Below, replace 'username' with your CAC user name and fetch or create the needed files on the cluster head node in your home directory.
first_test.py3 sample script can be found in /opt/ohpc/pub/containers/hoomd (OR it can be created from the simple example https://hoomd-blue.readthedocs.io/en/stable/index.html)
software.simg Singularity image can be copied from /opt/ohpc/pub/containers/hoomd to your \$HOME (It can also be fetched with singularity pull https://hoomd-blue.readthedocs.io/en/stable/installation.html)
usage : sbatch singularity_hoomd_ex.run
singularity_hoomd_ex.run example batch script (Remember to replace 'username' with your CAC user name):
#!/bin/bash
#SBATCH --job-name="singularity_hoomd_ex"
#SBATCH --output="singularity_hoomd_ex.%j.out"
#SBATCH --error="singularity_hoomd_ex.%j.err"
#SBATCH --nodes=1
#SBATCH --ntasks-per-core=1
#SBATCH --time=00:10:00
set -x
CONTAINER=/home/fs01/username/hoomd/software.simg
SCRIPT=/home/fs01/username/hoomd/first_test.py3

# placeholder for debugging
module load singularity
which singularity
set +x
echo "next command to run:  singularity exec --nv ${CONTAINER} python3 ${SCRIPT}"
singularity exec --nv ${CONTAINER} python3 ${SCRIPT}

## debugging commands can be inserted above
#echo hostname
#hostname
#echo "lspci | grep -iE ' VGA |NVI'"
#lspci | grep -iE ' VGA |NVI'
#echo nvclock
#nvclock
#echo "which nvcc"
#which nvcc
#echo "nvcc --version"
#nvcc --version
#echo PATH
#echo "$PATH"
#echo LD_LIBRARY_PATH
#echo "$LD_LIBRARY_PATH"
Example Singularity mpi test batch job
usage : sbatch singularity_mpi_ex.run
Example singularity_mpi_ex.run script (remember to replace 'username' with your CAC user name):
#!/bin/bash
#SBATCH --job-name="singularity_mpi_ex"
#SBATCH --output="singularity_mpi_ex.%j.out"
#SBATCH --error="singularity_mpi_ex.%j.err"
#SBATCH --nodes=5
#SBATCH --ntasks-per-core=1
#SBATCH --time=00:1:00

CONTAINER=/home/fs01/username/hoomd/software.simg

module load singularity

echo "script job head node $(hostname)"

# silence mpi component warnings
export MPI_MCA_mca_base_component_show_load_errors=0
export PMIX_MCA_mca_base_component_show_load_errors=0

echo "next command to run:  mpirun --mca btl self,tcp --mca btl_tcp_if_include eth2 singularity exec ${CONTAINER} hostname"
mpirun --mca btl self,tcp --mca btl_tcp_if_include eth2 singularity exec ${CONTAINER} hostname

# clean up exit code , consult .out and .err files in working directory upon job completion for mpi debugging
exit 0
Copy your data to /tmp to avoid heavy I/O from your nfs mounted \$HOME !!!
- We cannot stress enough how important this is to avoid delays on the file systems.
#!/bin/bash
## -J sets the name of job
#SBATCH -J TestJob

## -p sets the partition (queue)
#SBATCH -p normal
## time is HH:MM:SS
#SBATCH --time=00:01:30
#SBATCH --cpus-per-task=15

## define job stdout file
#SBATCH -o testnormal-%j.out

## define job stderr file
#SBATCH -e testnormal-%j.err

echo "starting $SLURM_JOBID at `date` on `hostname`"
echo "my home dir is $HOME"

## copying my data to a local tmp space on the compute node to reduce I/O
MYTMP=/tmp/$USER/$SLURM_JOB_ID
/usr/bin/mkdir -p $MYTMP || exit $?
echo "Copying my data over..."
cp -rp $SLURM_SUBMIT_DIR/mydatadir $MYTMP || exit $?

## run your job executables here...

echo "ended at `date` on `hostname`"
echo "copy your data back to your $HOME"
/usr/bin/mkdir -p $SLURM_SUBMIT_DIR/newdatadir || exit $?
cp -rp $MYTMP $SLURM_SUBMIT_DIR/newdatadir || exit $?
## remove your data from the compute node /tmp space
rm -rf $MYTMP

exit 0
Explanation: /tmp refers to a local directory that is found on each compute node. It is faster to use /tmp because when you read and write to it, the I/O does not have to go across the network, and it does not have to compete with the other users of a shared network drive (such as the one that holds everyone's /home).
To look at files in /tmp while your job is running, you can ssh to the login node, then do a further ssh to the compute node that you were assigned. Then you can cd to /tmp on that node and inspect the files in there with cat or less.
Note, if your application is producing 1000's of output files that you need to save, then it is far more efficient to put them all into a single tar or zip file before copying them into \$HOME as the final step.
Software
Modules
The 'lmod module' system is implemented for your use with listing and loading modules that will put you in the software environment needed. (For more information, type: module help)
To list current (default) modules loaded upon logging in:
module list
To list the available software and the software environment you can put yourself in according to what compiler is loaded in the above listing, type:
module avail
(to get a more complete listing, type: module spider) The software that is listed with "(L)" references what you have loaded.
EXAMPLE: To be sure you are using the environment setup for cmake3, you would type:
module load cmake3
module list (you will see cmake3 is loaded (L))
* when done, either logout and log back in or type:
module unload cmake3
To swap to a different set of modules per compiler, you can swap out your currently loaded compiler.
EXAMPLE:
module swap gnu8 gnu7
You will then see a different set of available modules upon typing: module avail
You can create your own modules and place them in your $HOME. Once created, type: module use $HOME/path/to/personal/modulefiles This will prepend the path to $MODULEPATH [type echo $MODULEPATH to confirm]
Reference: User Created Modules
- It is usually possible to install software in your home directory.
- List installed software via rpms: rpm -qa. Use grep to search for specific software: rpm -qa | grep sw_name [i.e. rpm -qa | grep perl ]
Build software from source into your home directory (\$HOME)
* download and extract your source
* cd to your extracted source directory
   ./configure --./configure --prefix=$HOME/appdir
[You need to refer to your source documentation to get the full list of options you can provide 'configure' with.]
   make
   make install

The binary would then be located in ~/appdir/bin.
* Add the following to your $HOME/.bashrc:
      export PATH="$HOME/appdir/bin:$PATH"
* Reload the .bashrc file with source ~/.bashrc. (or logout and log back in)
Jupyter Notebook Server
Installation
Follow these steps to install and run your own Jupyter Notebook server on capecrystal.
-
Create a jupyter-notebook python virtual environment:
- Load
python/3.8.3module:module load python/3.8.3 - Create a jupyter-notebook python virtual environment:
python -m venv jupyter-notebook
- Load
-
Install jupyter notebook in the jupter-notebook virtual environment:
- Activate jupyter-notebook virtual environment:
source jupyter-notebook/bin/activate - Install jupyter notebook:
pip install jupyter notebook
- Activate jupyter-notebook virtual environment:
Start the Jupyter Notebook Server on Compute Node
Use these steps to start the Jupyter Notebook server on a compute node:
-
Obtain shell access to a compute node and identify the compute node:
-bash-4.2$ srun --pty /bin/bash bash-4.2$ hostname c0002 -
Start jupyter notebook on the compute node:
module load python/3.8.3
source jupyter-notebook/bin/activate
jupyter notebook
Access the Notebook
-
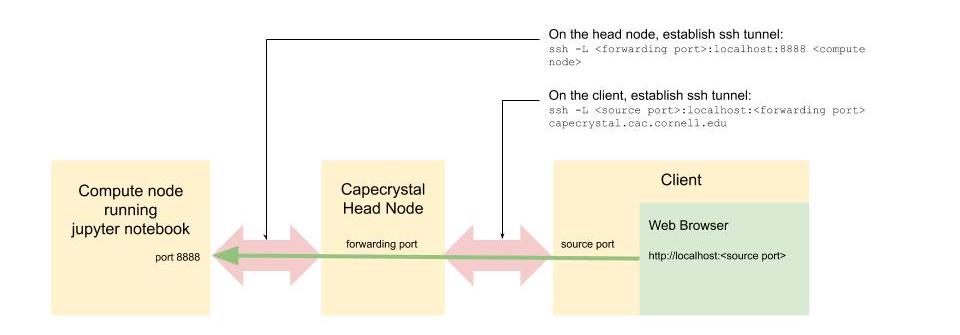
In a new terminal on your client, ssh to capecrystal head node. Establish an ssh tunnel between the head node's forwarding port (10000 in this example) and port 8888 on the compute node (c0002 in this example). Leave this terminal open after the ssh tunnel is established.
ssh -L 10000:localhost:8888 c0002 -
In a new terminal on your client, establish an ssh tunnel between the client's source port (20000 in this example) and the forwarding port on the capecrytal head node. Leave this terminal open after the ssh tunnel is established.
ssh -L 20000:localhost:10000 <user>@capecrystal.cac.cornell.edu -
On your client, point your web browser to:
http://localhost:20000