OpenStack Security Groups
Security Groups allow control over the types of communication that are possible between a Red Cloud instance and the internet. A security group is a collection of rules, each of which specifies that internet traffic will be allowed to come from (ingress) or go to (egress) a set of Internet Protocol (IP) addresses through a given set of ports. The permissions given by these rules accumulate to form the net effect of the security group. Multiple security groups can be assigned to an instance, and the permissions from multiple groups also accumulate.
Each Red Cloud project has a default security group that cannot be deleted. This security group will be assigned by default to every new instance that is created, though you can remove it if you want. Users will want to either modify the project's default security group or create additional security groups to provide access to types of internet communication that are not enabled by the default group.
Creating a Security Group
To see and work with your Red Cloud project's security groups in the web interface, choose the Network tab [1] and the Security Groups sub-tab [2]. The Security Groups page displays a list of the groups in the project, which are shared among all the project's users. You can filter the list to see only the groups of interest [3].
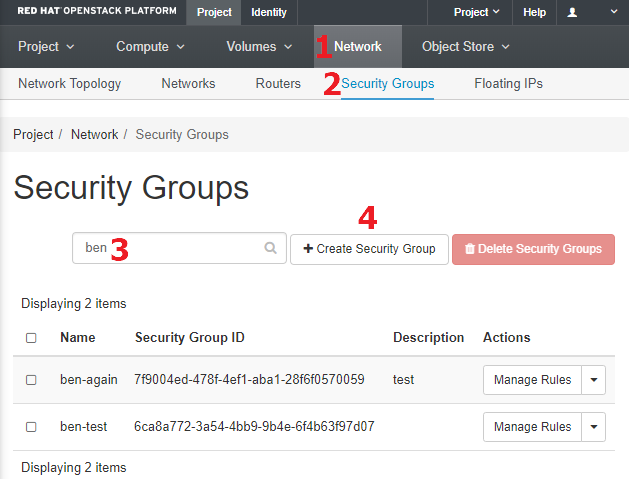
To begin the process of creating a new group, click the "Create Security Group" button [4], which opens the "Create Security Group" dialog. Enter a unique and meaningful name and optionally a description, then click "Create Security Group". The new group is created having only default rules and appears in the security group list. It is likely that you will want to immediately manage the group's rules to give it some functionality.
Managing a Security Group's Rules
Each entry in the list of security groups has a button/drop-down on the right side. The drop-down lets you change the group's name or description and delete the group if desired. Click the "Manage Rules" button to open a dialog that allows you to add or remove rules from the group. Note that you cannot edit an existing rule, so if a change is needed you will have to create a corrected rule and then delete the existing rule.
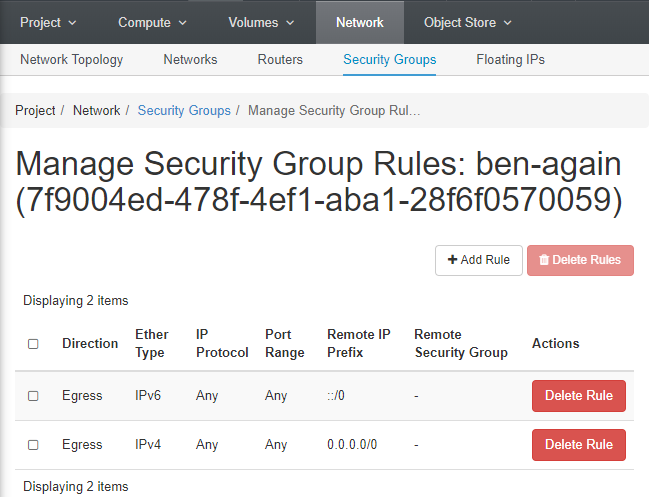
By default, a new group contains only two rules that allow all outgoing traffic (egress) from any instance in that group. Since you will want to connect to your instance in some fashion it will certainly be necessary for the group to belong to a security group containing at least one "ingress" rule that allows traffic in from the internet.
Linux instances will need to allow TCP connections on port 22, which permits
accessing the instance using the
SSH command.
Windows instances will need to allow TCP connections on port 3389 to permit
access using the Remote Desktop Protocol (RDP). Additional ports may need to be opened depending on how the instance is used. For example, a web server will require the opening of ports 80 and/or 443 (for HTTP and HTTPS). It is recommended that users that open more ports should restrict the open IPv4 ranges to prevent unauthorized access.
Adding a Rule to a Security Group
To discuss adding a rule to a security group we will consider the example of a Linux instance, which needs to open port 22 to allow users to SSH in to the instance. To add such a rule to a group, click the "Add Rule" button to bring up the Add Rule dialog. The "Rule" drop-down [1] provides a list of common types of rules and also allows you to create various flavors of custom rules. To allow SSH traffic to the instance, select the "SSH" entry in the "Rule" drop-down [1]. This will cause some irrelevant entry boxes in the dialog to be hidden.
Alternatively, you can choose "Custom TCP Rule" in the "Rule" drop-down [1]. To allow SSH traffic to the instance, select the "Ingress" entry in the "Direction" drop-down. Select "Port" in the "Open Port" drop-down. Enter "22" in the "Port" drop-down.
After setting appropriate values for the remaining entry boxes (discussed below), click "Add" [2] to add the rule to the security group.
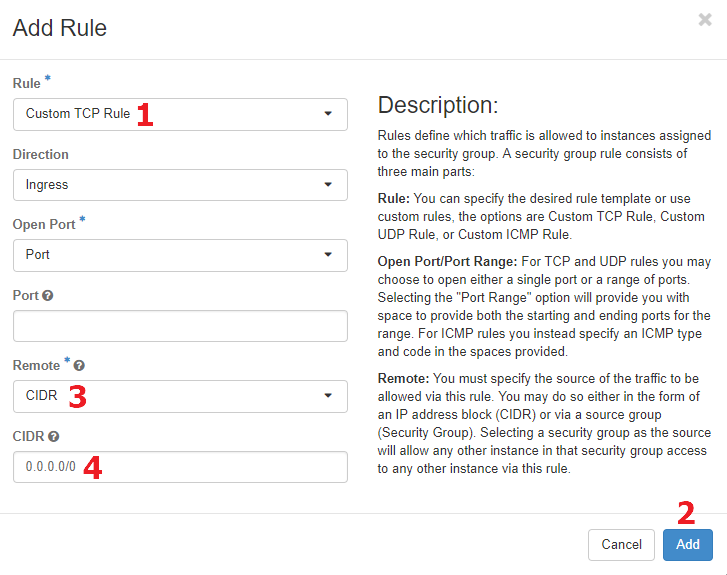
The "Remote" drop-down [3] allows you to choose whether the rule will allow traffic from a set of IP addresses specified by a "Classless Inter-Domain Routing" (CIDR) value, or from any instance that belongs to a specific security group. If you choose CIDR, you will need to provide a valid CIDR specification [4] and if you choose Security Group you will need to choose one of the project's groups.
CIDR specifications define an IP address range that can be specific enough to allow access only to a single computer or general enough to allow access to all computers in a domain or sub-domain. A specification of 0.0.0.0/0 (the default) will allow access to the whole internet, and is not recommended for security reasons. If you wish to allow access to multiple sub-domains it will be necessary to create multiple similar rules, one for each of the sub-domains you want.
Red Cloud users will commonly want to provide access only to Cornell IP addresses. CAC recommends using the following three CIDR specifications to limit access to Cornell computers.
- 128.84.0.0/16
- 128.253.0.0/16
- 132.236.0.0/16
- 192.35.82.0/24
- 192.122.235.0/24
- 192.122.236.0/24
- 10.0.0.0/8
To limit access to CU VPN only, use the following CIDR. With this method, users will need to connect to CU VPN from anywhere on the Internet before they can access instances belonging to this security group.
- 10.41.224.0/19
- 10.17.0.0/14
Assigning Security Groups to an Instance
Security groups can be assigned to an instance both when the instance is being created or afterwards. They can also be removed from an instance. Internet access to and from the instance is the cumulative access provided by all rules in all security groups to which the instance belongs.
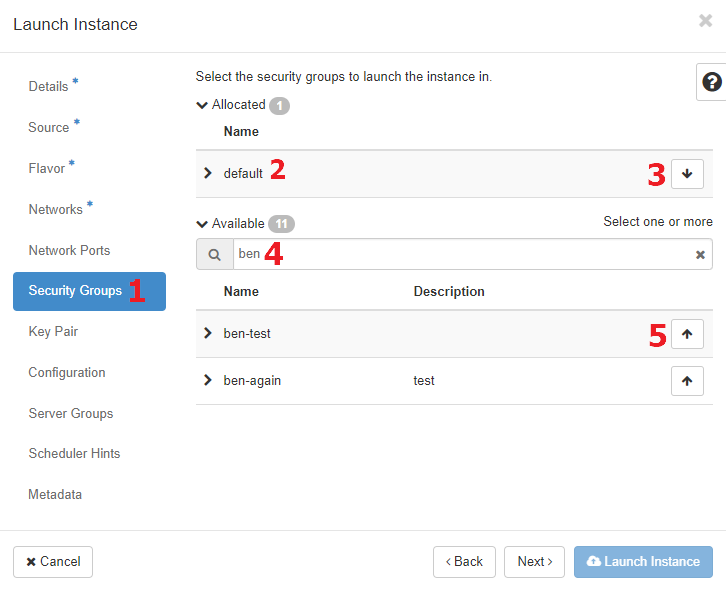
When creating a new instance, initial security groups can be assigned in the "Security Groups" tab [1] of the "Launch Instance" dialog. By default, the "default" security group is included [2] for new instances, but can be removed using the down-arrow button [3]. The list of existing security groups in the project can be filtered [4] to help find groups of interest. The new instance can be added to more security groups by clicking their up-arrow buttons [5].
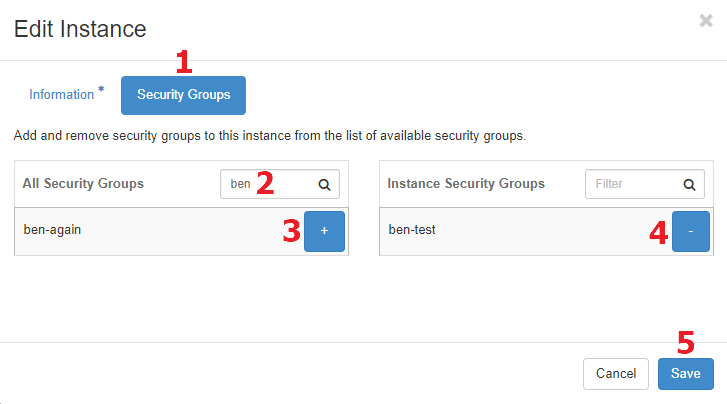
To manage the security groups to which an existing instance belongs, find the instance in the list of the Compute/Instances page and select the "Edit Instance" option in its menu. This brings up the "Edit Instance" dialog where you can click "Security Groups" [1] to manage the groups. This dialog allows you to filter the list of groups [2] and add [3] or remove [4] any desired groups to/from the instance. Click Save [5] to apply the changes to the instance.