OpenStack Key Pairs
The best way to provide secure and easy access to your Red Cloud instances is through the use of key pairs for SSH authentication. Key pairs are made up of a private key that only you know, and a public key that is distributed to people and systems with which you would like to have secure communications. Red Cloud allows you to easily generate or upload such key pairs to use with your instances.
When you create a new instance you should specify a key pair to be used for logging in to that instance. You can only add a key pair to an instance at the time of its creation, not afterwards, so it is important not to overlook this step. It is possible to generate a new key pair during the process of creating an instance.
In Linux instances, the pair's public key is installed into the root (or ubuntu user) account at the time of its creation, allowing you to login simply by providing the private key. For Windows instances, you will need to provide the private key in PEM format to the Red Cloud web interface in order to fetch a valid password for logging in to the instance's administrator account.
Key pairs are created per user within an account, so other account members will not be able to use the key pairs you create. You will also not be able to use a given key pair in multiple accounts unless you import it into each account.
Creating a Passphrase-Protected Key Pair (Recommended)
The recommended way (for security reasons) to use key pairs is through a passphrase-protected key pair.
To create a passphrase-protected key pair, enter a terminal on your operating system. Navigate to a directory where you wish to store the key pair, using cd on a Mac or Linux (more information can be found here: Linux Tutorial). Then, enter this command:
ssh-keygen -t rsa -f cloud.key
It will then prompt you to enter a passphrase. Type a secure passphrase and hit enter. This generates a passphrase-protected private key (cloud.key) and a public key (cloud.key.pub). Alternatively, you can give the key-pair a name that links it back to the person who created it, so others can easily tell who was the initial administrator of the instance. This is especially useful if one ends up adding other users.
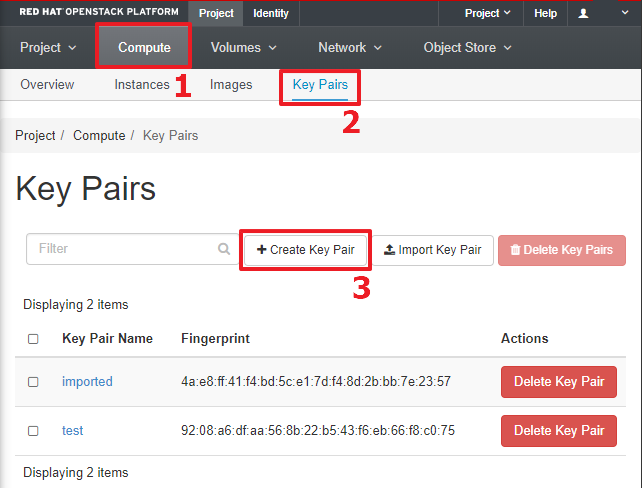
Your key pairs can be managed through the Red Cloud web interface by selecting the "Compute" tab [1] and then selecting the "Key Pairs" sub-tab [2]. This will display a list of your current key pairs as well as buttons for creating, importing or deleting key pairs. Click the "Import Key Pair" button on that page.
Enter a key pair name and paste your SSH public key into the corresponding fields.
To paste your SSH public key (cloud.key.pub), first enter a terminal, and make sure you are in the directory that contains your public key. Then enter this command:
cat cloud.key.pub
Copy the output from that command and paste it into the corresponding field on OpenStack. Next, click "Import Key Pair" to close the dialogue.
Now when you are launching your instance, in the Key-Pair section, select your imported key-pair for use in your instance.
After you have launched your instance and are trying to access it, you will login using the following command, which uses the private key. Make sure you are in the directory where the private key is stored when using this command.
ssh -i cloud.key <username>@<instance_ip>
The username may differ based on the image used to launch your instance (e.g., ubuntu on an Ubuntu instance) and the instance_ip is your instance's IP address, which can be found on the Instances page in OpenStack. You will then be prompted to enter in your passphrase to use your private key for this command.
Also, it's possible to add more key-pairs after using this one to log in, for your account or others, because you can always just add more public keys to ~/.ssh/authorized_keys. Instructions for adding a public key to the authorized_keys file is covered in the Linux Tutorial.
A passphrase-protected key pair is generally used if you want to have open security group access. If, for example, all of your collaborators are from Cornell University, you can lock down the security group to only Cornell-associated IP addresses. If some collaborators are not from Cornell, then it may be better to have open access to your security group, while using passphrase-protected SSH keys.
Importing a Key Pair
If you already have an SSH key pair that you would like to use with Red Cloud, you can import it rather than creating a new one. To do so, click the "Import Key Pair" button [1] on the Key Pairs page. This brings up a dialog for creating a key pair.

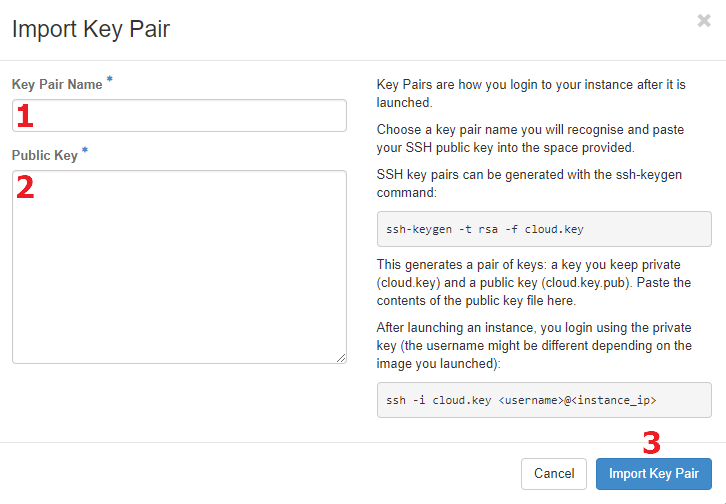
The Import Key Pair dialog contains some detailed instruction for generating key pairs on your computer. Using either an existing key or one that you generate by following those instructions, enter a unique and meaningful name for the key pair [1] and paste the entire text from its public key into the provided space [2]. This public key text should begin with "ssh-rsa" and end with a name, with a long string of letters and numbers in between. When you have entered those two values, click "Import Key Pair" [3]. They key pair will be imported and will appear in the Key Pairs list.
Selecting a Key Pair When Creating an Instance
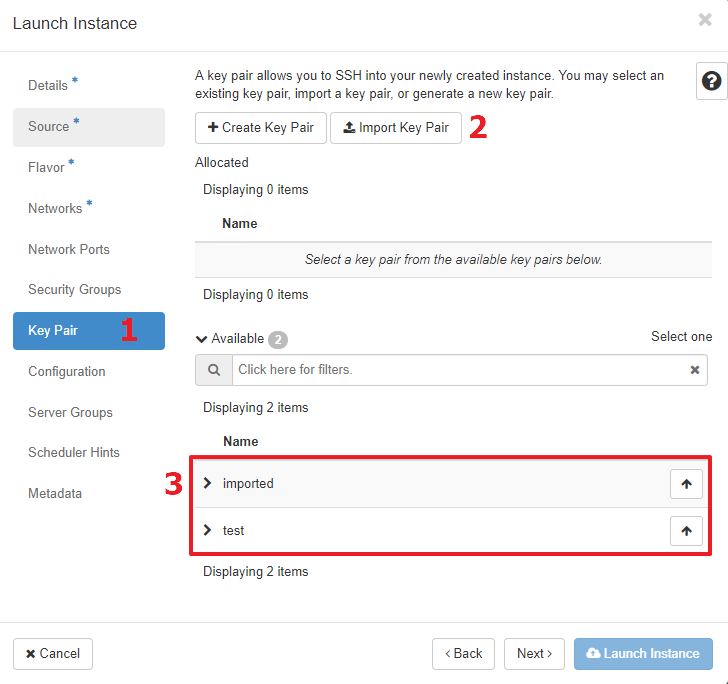
During the process of creating an instance you have the opportunity to assign a key pair to the new instances. This happens in the Key Pair tab [1] of the Launch Instance dialog. If you have not previously created or imported a key pair into your project, you can do so here [2]. If you would like to use one of the existing key pairs in the project, click the up arrow button in the list of existing key pairs [3].
Using Your Key Pair to Connect to a Linux Instance
If you specified a key pair when creating a Linux instance, the key pair's public key was installed into the initial user account on the instance. When connecting to the instance using the SSH command, you can pass the corresponding private key to establish a secure connection without need for a password. The following example of the SSH command syntax is for a private key stored in the file "my_key_rsa" and a CentOS system where the initial account is named "centos".
ssh -i my_key_rsa centos@128.84.8.1
For more information, see the section on Accessing Instances including some troubleshooting tips. If you would like to connect to a Linux instance using the PuTTY application, you will first need to convert your private key from the "pem" format to PuTTY's "ppk" format using the puttygen tool that is installed with PuTTY.
Using Your Key Pair to Connect to a Windows Instance
To log on to a Windows instance for the first time you will need to use the "administrator" account and a password that you can retrieve through the web interface by providing your private key.
If you made a key pair with ssh-keygen command, follow these additional steps to convert your private key to PEM format, which is the format OpenStack accepts in retrieving passwords. Make a copy of your private key (For Windows, use copy) so that your new key has '.pem' filename extension, and convert the new key to PEM format with ssh-keygen:
   cp cloud.key cloud.key.pem
   ssh-keygen -p -f cloud.key.pem -m pem
Under the "Compute" tab and the "Instances" sub-tab, find your Windows instance in the list. With the instance running, open the menu on the right side of its list entry and select the "Retrieve Password" option. This will display a dialog box where you can enter your private key.
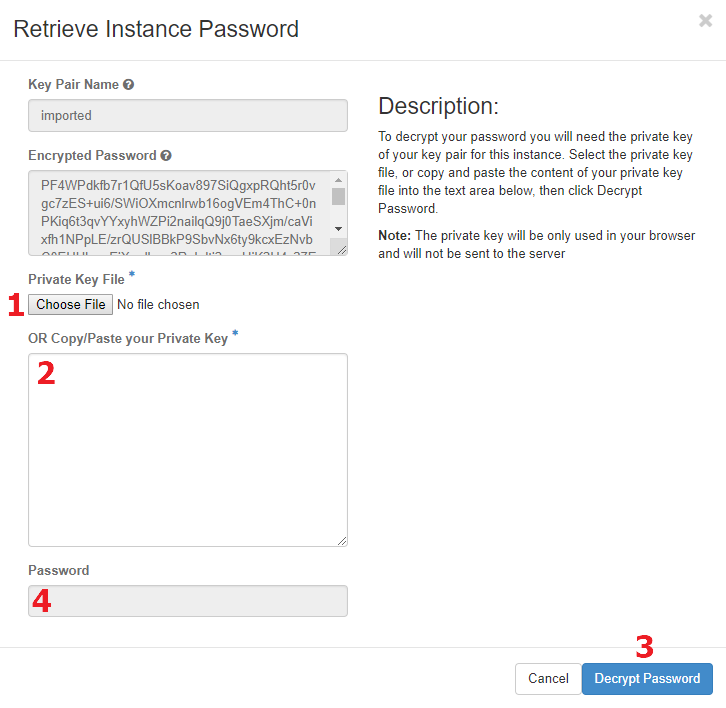
The dialog displays the name of the key pair that was assigned when the instance was created, along with the public part of the key pair. You need to provide the private key in PEM format by either choosing a file that contains it [1] or by pasting the text of the private key (including the header and footer) into the space provided [2]. Once the private key is entered, click the "Decrypt Password" button [3]. If the key does not match, an error message will be displayed in the background web page. If the key matches, a password for the "administrator" user will be displayed [4]. Copy this password into your computer's clipboard and supply it when logging into your Windows instance using the Remote Desktop application. You can remove the key with '.pem' extension if you choose to.
For more information, see the section on Accessing Instances.
Creating a Key Pair Without a Passphrase
This section is only useful if you plan to use key pairs without a passphrase, which should only be used when you have sufficient security measures in your security group that limit IP addresses that can access the instance.
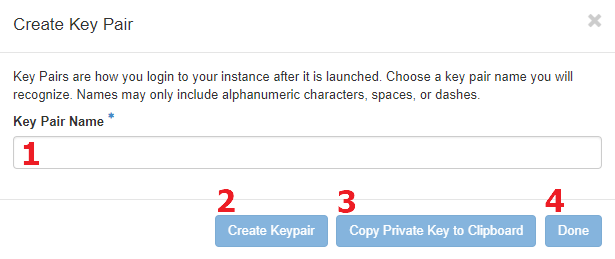
Your key pairs can be managed through the Red Cloud web interface by selecting the "Compute" tab [1] and then selecting the "Key Pairs" sub-tab [2]. This will display a list of your current key pairs as well as buttons for creating, importing or deleting key pairs. Begin by clicking "Create Key Pair" [3], which raises a simple wizard dialog.
Enter a unique and meaningful name for the key pair [1] and then click "Create Keypair" [2]. Note that if the name you entered is invalid, the error message will be displayed in the underlying "Key Pairs" web page. The text for your private key is then displayed in the wizard. It is critical that you copy this text, either by selecting all of the text in the display and using a hot key or context menu item to copy it to the clipboard, or by clicking the "Copy Private Key to Clipboard" button [3]. This will be your only chance to copy the text, so do not forget to do so. When you have copied it, click "Done" [4] to close the wizard.
The newly created key pair will now be shown in the list. It can be deleted using the button on the right of its entry, and clicking on the key pair's name will show more information about it, including its public key.
You now must save the private key that you copied to your computer's clipboard into a file having the ".pem" extension. If you save the file with any other extension, you may not get the correct formatting. The file you saved the private key to must also be in plain text format.
After copying the private key, open any simple text editor, but not a word processing app like Word. On Windows that could be Notepad, on Mac it could be TextEdit, and on Linux that could be any text editor you have installed, like gedit.
If you use TextEdit, the default format is RTF (Rich Text Format), not plain text. You need to change the format to plain text first (under the "Format" menu) in order to have it saved correctly.
Next, open a new text file, and paste the private key text into the new file. Make sure to paste all the text you copied from the private key dialogue from Red Cloud. The text you paste should include BEGIN RSA PRIVATE KEY and END RSA PRIVATE KEY, and the accompanying dashes.
Next, save the file as <key name>.pem, where <key name> is your key name, in an easily accessible directory. Make sure to have only a .pem extension on the saved file, without any extra .txt or such extensions.
Lastly, if you are on Mac or Linux, make sure to set the file to the appropriate permissions. Open a terminal to access the directory with your saved key file, and enter chmod 600 <key name>.pem< to change the permissions.
The sections below will describe how this file is used to connect to a Linux instanceor retrieve the administrator account's password for a Windows instance.
Additionally, it is possible to add a passphrase to this private key after it has been created. Once the .pem file has been downloaded to your local machine, you can run "ssh-keygen -p -f keyfile" in a terminal, where keyfile is the name of the private .pem file that you downloaded. When you enter this, you will be prompted to provide a passphrase, and the keyfile will be overwritten with the additional information containing the encrypted passphrase.