OpenStack
OpenStack is an open-source cloud stack that is currently running on Red Cloud. Also, for more information, see the Official Documentation for OpenStack.
This page is intended as a quick walk-through of the most-used features of OpenStack, so it is not comprehensive, but links to a lot of supporting documentation for more thorough explanations and advanced topics.
Using the OpenStack Web Interface (Horizon)
There are two ways to manage Red Cloud resources:
Most users will use the OpenStack Web Interface (called Horizon). This web-based interface can be used to manage instances and volumes. For Linux Instances, however, some users may choose to use the OpenStack CLI. This section focuses on the OpenStack Web Interface.
Logging into OpenStack
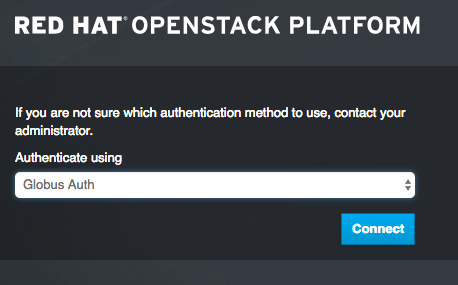
Log in to the OpenStack Web Interface to create and manage Red Cloud resources. There are two ways to login:
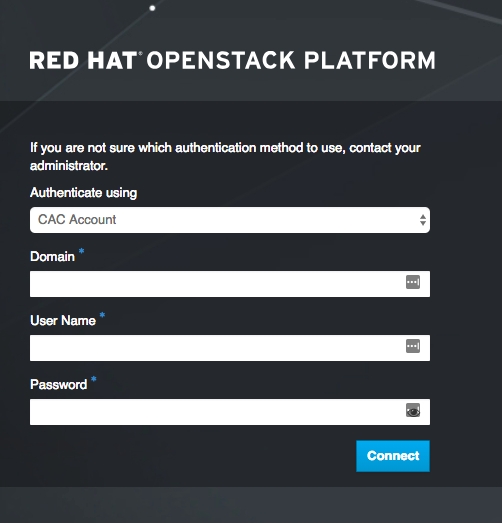
- CAC Account - Enter cac as the "Domain" and your CAC username and password, not your Cornell NetID. If your CAC password has expired, you will need to reset it before you will be able to login to the OpenStack Web Interface.
-
Globus Auth - Log in through Globus
-
Currently, this feature is only available to Aristotle users. This feature will be enabled for all users in the future.
- You must link your Cornell account, or any accounts attached to the projects you are on, in order to have access to them when using Globus Auth.
- If you can't log in with Globus Auth, it may be that you have not linked your account yet.
You can use the "Authenticate using" drop-down to switch between the two options. Neither option requires you to enter a project ID; you can switch between the projects you are on once logged in.
Overview Page
The Overview page is the first place you will be taken upon logging into Red Cloud.
- Provides useful metrics on currently selected project
- Before creating an instance, you will need to:
- Select the correct project from the "Project" drop-down at the top right of the page (if you are on multiple projects)
- Create a key pair - for authentication when you log in the first time
- Create a security group - defines allowable types of port access for an instance
- Optional: Set up a private network - if you do not want your instance to be available on the public network
- You may also want to:
- Create and Attach a Volume (can also be done when launching an instance)
- Associate a Floating IP address - a fixed IP address that can be assigned to an instance
Key Pairs
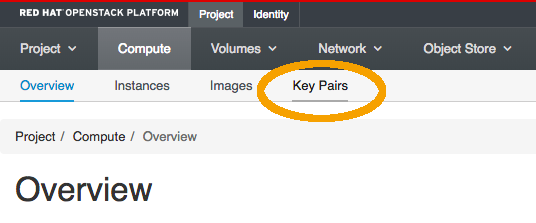
To get to the Key Pairs page: select the "Compute" tab along the top (you should start here at login), then click on "Key Pairs" along the top bar as pictured above. If you are logged in already, you can also get to it by this link: Key Pairs.
On the Key Pairs page, you can view the list of available key pairs for your project. From here, you can also create or import a key pair. If you do not already have a key pair listed, you can either create one before launching an instance, or create or upload a key pair during instance setup.
For more information, here is a walk-through on OpenStack Key Pairs.
Security Groups
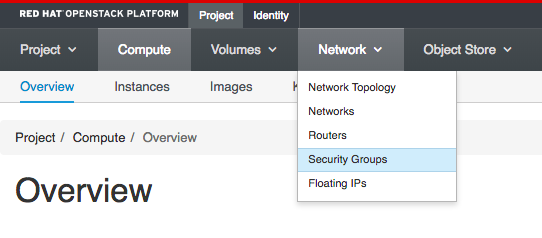
To get to the Security Groups page: select the "Network" drop-down menu along the top, then click on "Security Groups" as pictured above. If you are already logged in, you can also get to it by following this link: Security Groups
On the Security Groups page, you can view a list of available security groups for your project, including a default security group. On this page, you can also create and delete security groups. It is not recommended that you use the default security group without modifying the rules to fit your needs. A good security practice is to have one security group per application or one per user. Instances that have no business talking to each other should generally be in separate security groups.
If you do not already have a security group set up, you will want to create one before launching an instance because you cannot create one during instance setup. However, you can assign a security group to an instance later, and even add or modify the rules of the security group at any time.
For more information, here is a walk-through on OpenStack Security Groups.
Instances
Each instance is a Virtual Machine (VM) in the cloud. You can select CPU/RAM/disk configurations (called "flavors") for the VM. Note that each vCPU currently equates to one core. The available VM configurations are:
| Flavor | vCPUs | GPUs | RAM |
|---|---|---|---|
| c1.m8 | 1 | None | 8 GB |
| c2.m16 | 2 | None | 16 GB |
| c4.m32 | 4 | None | 32 GB |
| c8.m64 | 8 | None | 64 GB |
| c14.m112 | 14 | None | 112 GB |
| c20.m160 | 20 | None | 160 GB |
| c28.m224 | 28 | None | 224 GB |
| c64.m120 | 64 | None | 120 GB |
| c128.m240 | 128 | None | 240 GB |
| *c4.t1.m20 | 4 | 1 Nvidia T4 | 20 GB |
| *c14.g1.m60 | 14 | 1 Nvidia V100 | 60 GB |
| *c16.a1.m55 | 16 | 1 Nvidia A100 | 55 GB |
_Note: * Signifies GPU flavors
When you are first starting an instance, we recommend that you select the smallest flavor (least number of CPUs) that you think will be able to handle installation and configuration of the software and environment on your instance, and then resize the instance when you are ready to run. The "c1.m8" flavor will typically be enough, as you will not need much memory or compute power while setting up your software. This way you will save core hours that would otherwise have been spent idle. This method is especially useful when configuring a GPU instance due to the number of cores. Also note: you can begin with a smaller instance size (or flavor) that does not contain a GPU, and later resize to one that does.
The root disk size of the instance will default to the size of the image you select. You have the option to create a volume as the root disk beyond the image size at launch time. Note that we do not oversubscribe physical RAM, CPU cores, or GPUs (hyperthreading is disabled).
To work with instances, select the "Instances" page under the "Compute" tab, as pictured below:

Launch an Instance
This section is a general walk-through for creating a new instance, which is not specific to an Operating System (OS). For more specific information per OS, see either of these pages:
To launch a new instance
- Create Key Pair
- Create a Security Group and be sure that you select the appropriate rule for connecting to your instance (SSH for Linux Instances and RDP for Windows Instances)
- Select "Launch Instance" on the top right side of the Instances page

The full "Launch Instance" menu will pop up like this:
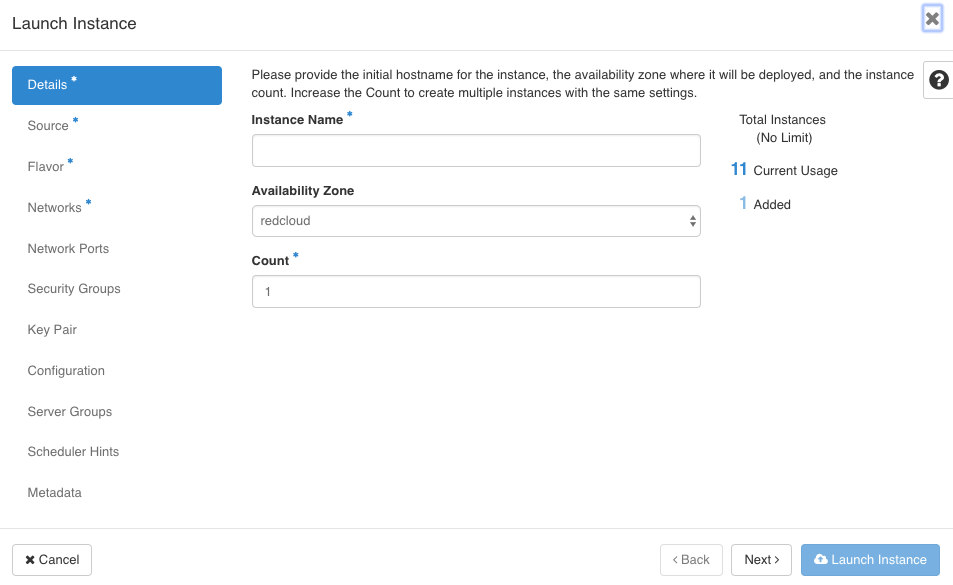
- Tabs that you are required to fill out are marked with a *
- It is recommended that you also select your own Security Group, otherwise the default security group will be selected, which may not be ideal for your work.
- It is necessary that you select your own Key Pair, even though this field is not marked required, so that you are able to connect to your instance after creation.
Configuring the Instance
- Under the "Details" tab:
- Enter a name for your instance
- Count is the number of identical instances you would like to create (typically 1).
- Note that if you create multiple instances this way, the names will be identical with a dash and number added at the end.
- For example, if you set Instance Name to "my_instance" and you set Count to 3, you would start instances named "my_instance-1", "my_instance-2", and "my_instance-3".
- On the "Source" tab:
- You must Select Boot Source, which is described on the page as "the template used to create an instance."
- It is generally a good idea to start with an image as the source, unless you want to create an instance from a pre-existing source.
- For more information on the other options, see creating an image.
- You can select a specific source under the Available list by selecting the up arrow on the right-hand side.
- Get more details about the specific source by selecting the right-arrow on the left-hand side next to the name.
- You will have the option to Create New Volume if you have selected either "Image" or "Instance Snapshot" as the source (default is "Yes"):
- Yes: If selected, a volume will be created to be the instance's root disk. You will then have the options of extending the size of the volume beyond the image size, and deleting the volume when the instance is deleted.
- Volume Size is the size of your root volume. The default number will match the size of the image you select, and can be increased.
- Delete Volume on Instance Delete determines whether or not the root volume will be deleted automatically when you terminate the instance. The default is "No", which prevents your data from being deleted when you delete your instance (perhaps accidentally). However, if you do not need this extra level of protection, and you do not intend to re-use the root volume, you could unintentionally incur excess storage usage. Therefore, it can be a good idea to set this option to "Yes" so that the volume is deleted automatically when you terminate your instance. Your alternative is to find and delete the root volume manually, later (it will show up in the list of volumes with a name identical to its arbitrarily assigned ID, unless you give it a different name).
- You can also customize the name of the volume under Device Name.
- No: If selected, the instance will boot off a root disk the same size as the image. The root disk will be deleted when the instance is deleted.
- Yes: If selected, a volume will be created to be the instance's root disk. You will then have the options of extending the size of the volume beyond the image size, and deleting the volume when the instance is deleted.
- You must Select Boot Source, which is described on the page as "the template used to create an instance."
- The "Flavor" tab is where you select the VM configuration discussed above.
- We recommend that you select the smallest flavor (least number of CPUs) that you think will be able to handle installation and configuration of the software and environment on your instance, and then resize the instance when you are ready to run. This way you will save core hours that would otherwise have been spent idle. Also note: you can begin with a smaller instance size (or flavor) that does not contain a GPU, and later resize to one that does.
- You can select a configuration by selecting the up arrow on the right-hand side.
- Get more details about the configuration by selecting the right-arrow on the left-hand side next to the name.
- The "Total Disk" will show "0 GB" because the disk size will match the image you selected on the "Source" tab.
- For the "Networks" tab, two options are available:
- You can make the instance available on the public net. This is the simplest and most common selection.
- You can select your own private network, which has to be set up before you launch an instance. For more information, see the networks page.
- On the "Security Groups" tab, select the security group you already created.
- On the "Key Pairs" tab, select the key pair you already created.
Instance States
OpenStack defines several Server States through which you can move your instances. You change the state of your instance by making a selection from a drop-down menu under the Actions column. Three significant actions to know about are "Resize Instance", "Shelve Instance", and "Unshelve Instance"; these are described below.
Allowed actions—i.e., the ones that appear in the drop-down menu — depend on the current state of the instance. For example, the "Resize Instance" action is allowed only for instances that are in the Active state. The figure below shows the possible states in OpenStack and the transitions that are allowed in each case.
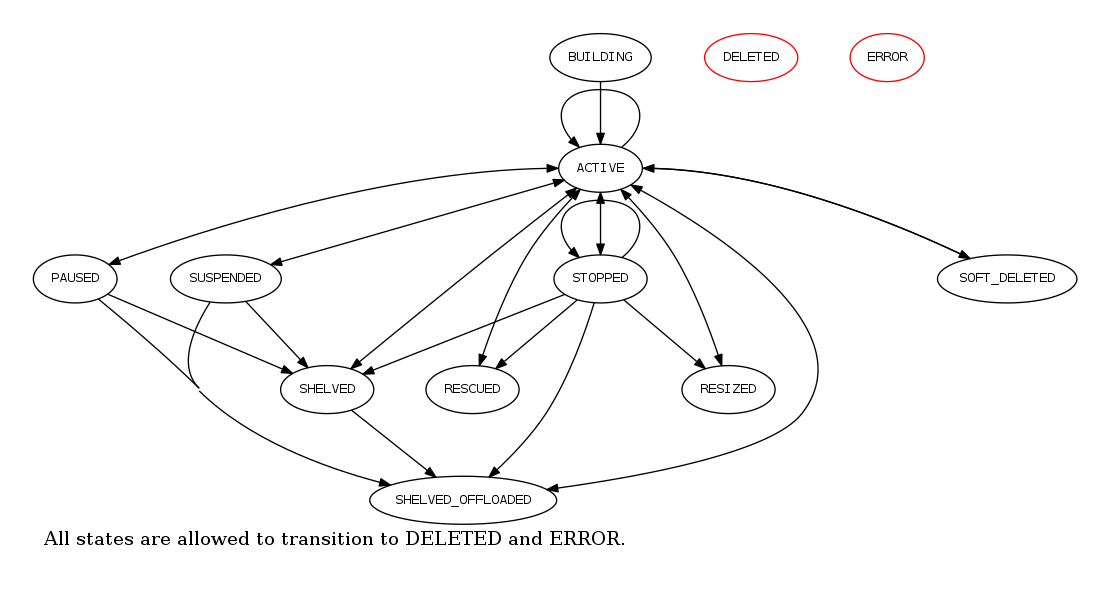 Source: OpenStack
When your instance has been created, the "Instances" tab will list its current state (as well as the state of your other instances) under the "Status" column. In the rightmost column called "Actions," you will see a drop-down menu for each instance. This menu lists the actions that are allowed for the given instance. Below we describe the typical states and list some of the common actions you will use to change instance state.
Important States
Note: The only state where you are NOT being charged for computational resources is Shelved Offloaded
- Active: Instance is active, you can connect to it and are being billed for the computational resources dedicated to it.
- Shelved Offloaded: The Instance is not resident on the compute host; this means you will not be billed for computational resources while the Instance is in this state (although you will be charged for the storage required to hold it). You can restart the server when you need it again.
- Paused: In this state, the server state is preserved in RAM, but operations have been stopped and will resume when instructed. You are still being charged for the computational resources dedicated to the Instance.
- Suspended: Instance state has been stored on disk, including the contents of its RAM. With Red Cloud's configuration, you are still paying for the computational resources you were using.
- Stopped: This is like powering off a server; in this state, you are still being billed for the computational resources.
- Resized: At this time, the Instance is being Resized to a different flavor—that is, a different allocation of vCPUs and RAM—and is not contactable.
Operations to transition between states
These options are available, subject to the current state of the Instances, from the dropdown available in the "Actions" column of the Instances page. Remember that Shelving is the only operation that will free up the computational resources your Instance has been using so that you stop being charged for them!
- Pause Instance: Put instance into the Paused state.
- Suspend Instance: Put instance into the Suspended state.
- Shelve Instance: This is how you put the Instance aside so that you are no longer charged for computational resources being used; your Instance will still be visible on the Instances page with Status Shelved Offloaded. To get the Instance back up and running, select "Unshelve" from the actions menu.
- Resize Instance: Allows you to select a new Instance flavor. After you have selected it, Status will be shown as "Confirm or Revert Resize/Migrate" you will have to confirm in the Actions dropdown, after which the Instance will be taken down and then come back up with the new computational resources available to it. On Linux you can check with commands such as
lscpuorcat /proc/cpuinfo; on Windows you can, for example, use the "Performance" tab of Task Manager to see the available cores. - Resume Instance: Will restart the Instance from states of Paused and Suspended
- Soft Reboot Instance or Hard Reboot Instance: Reboot your instance, either through issuing a command to the operation system ("Soft") or as if power-cycling the Instance ("Hard")
- Shut Off Instance: Like powering off the Instance, an action you will need to confirm in a pop-up window. The Status shown will be Shutoff and you will need to "Restart" to get it back. Additionally, if you are logged into an instance and use an OS command such as
sudo powerofforsudo init, the Instances page will show the same status and you will need to select "Restart" to get the Instance back up and running. In this state, you are still being charged for computational resources.
Deleting a Red Cloud instance
For data safety, make sure to back up any data you want to keep before deleting any volumes or instances. You can avoid creating orphaned boot volumes by (a) choosing "Delete Volume on Instance Delete" when you first launch an instance, or (b) deleting the boot volume immediately after you delete the related instance. You do the latter by following the two-step procedure below. If the instance was deleted before the boot volume could identified, skip to step 2.
Step 1: Identify the boot volumes before deleting the instances.
- View your list of instances at https://redcloud.cac.cornell.edu/dashboard/project/instances/.
-
For each instance you would like to delete, click the instance name to load the overview page. Find the "Attached to" line in the "Volumes" section at the bottom of the page. It will look something like the entry below:
Volumes Attached Attached To d35e1234-b99d-48a9-a827-97d6f8eca4fb on /dev/vda -
Note the long alphanumeric string (d35e1234-b99d-48a9-a827-97d6f8eca4fb) and copy it to a note. If you created separate data storage volumes, you might see them attached to an instance as well (as second or third attached volumes). If appropriate, you can also delete these attached storage volumes in step 2.
- After you have made notes about which attached volumes to remove in step 2, delete the instance using the drop down menu at the end of the instance row.
- Repeat for each additional unwanted volume.
Step 2: Manually delete the identified boot volumes after deleting the instances.
- View your volumes at https://redcloud.cac.cornell.edu/dashboard/project/volumes/.
- Depending on the options selected when the instance was created, a deleted instance might leave an orphaned boot volume behind.
- Use the list of drive identifiers generated in step 1 to select and delete any orphaned volumes. You can use the drop down menu at the end of each row to delete each orphaned volume.
- For the remaining volumes, click on the volume name to see the volume overview. It might be possible to identify unwanted volumes from this meta-data (i.e. you can tell it is a boot volume because it is based on an OS image). It is up to you to verify that volumes are truly unwanted and that important data has been backed up before deleting.
- OS-image-based volumes are almost certainly boot volumes and if they are not attached to any current instance, they may be orphaned.
- If you are left with unidentifiable volumes, it is possible to mount these to an instance and inspect their contents.
- In some cases, it is easier to identify the volumes you want to keep by identifying the boot and data volumes attached to instances you are using.
- The storage information updates about once every 4 hours. After you have deleted the volumes and the storage information updates, your project page should show a lower storage usage.
Migrate an Instance to a New Project
Occasionally, you may have an instance in one Red Cloud project that you would like to migrate to a different project. If you have been working in an exploratory project and are transitioning to using a permanent project, you may want to bring along the instances you have created. Or, you may want to share an instance with someone who is working in another project. The steps to perform such migrations are not difficult and can be performed through the Red Cloud (Horizon) web interface.